2023.05.23 16:02:09
创建一个main.c,并引入头文件unistd.h和stdlib.h以及sys/wait.h。随后在主程序中调用fork()创建子进程,并根据函数返回值确定进程类型,并执行相应操作。
如果rc==0,则当前进程是子进程,使用stdlib.h提供的I/O函数进行文件创建和写入工作。
如果rc>0,则当前进程是父进程。调用wait()等待子进程结束后再执行即可。
#include <stdio.h>
#include <stdlib.h>
#include <unistd.h>
#include <sys/wait.h>
int main(void){
FILE *fp;
int rc=fork();
if(rc<0) {
fprintf(stderr, "Failed to create child process.\n");
} else if(rc==0) {
fp=fopen("./test.txt", "w");
fprintf(fp, "Hello, world!\n");
fclose(fp);
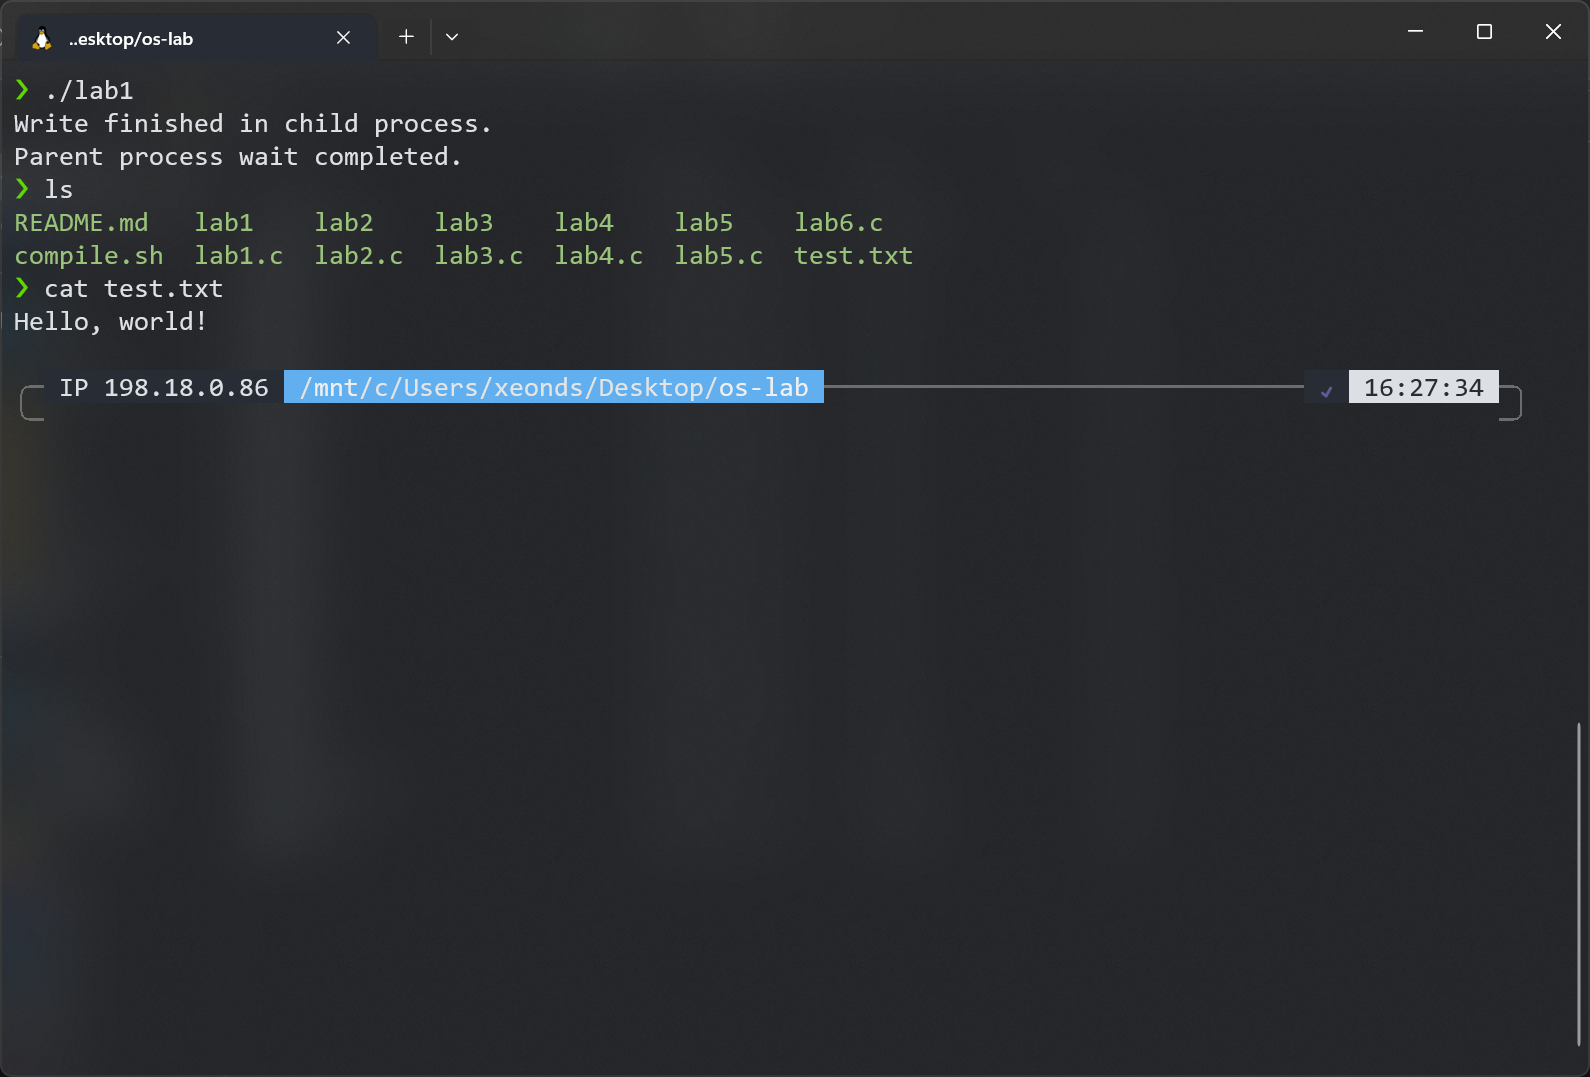
printf("Write finished in child process.\n");
} else {
int wc=wait(NULL);
printf("Parent process wait completed.\n");
}
return 0;
}
可以看到,程序的执行顺序确实是先子进程再父进程。输出的文件内容也正确。
通过这次实验,我懂得了Linux下fork()系统调用的用法,知道了如何创建一个新的进程,也知道了fork()的返回值的含义,能编写一个单文件的多进程程序。
创建一个main.c,并引入头文件pthread.h和stdio.h。在主程序中定义一个全局变量count作为共享数据,并初始化为0。随后在主程序中创建两个线程,并传入一个函数指针作为线程执行的任务。
该函数指针指向一个自定义的函数thread_func,该函数接受一个整型参数id作为线程标识,并在函数内部对全局变量count进行加一操作,并打印出当前线程的标识和count的值。
在主程序中,使用pthread_join等待两个线程执行完毕后再退出。
#include <stdio.h>
#include <stdlib.h>
#include <unistd.h>
#include <sys/wait.h>

static int data = 123;

int main(void){
 printf("[%d] main process data:%d\n", (int)getpid(), data);

 int rc = fork();
 if(rc<0){
  fprintf(stderr, "Fork failed.\n");
  exit(1);
 } else if(rc==0) {
  printf("[%d] sub process data:%d\n", (int)getpid(), data);
  data+=5;
  printf("[%d] sub process data:%d\n", (int)getpid(), data);
 } else {
  int wc=wait(NULL);
  printf("[%d] main process data:%d\n", (int)getpid(), data);
 }

 return 0;
}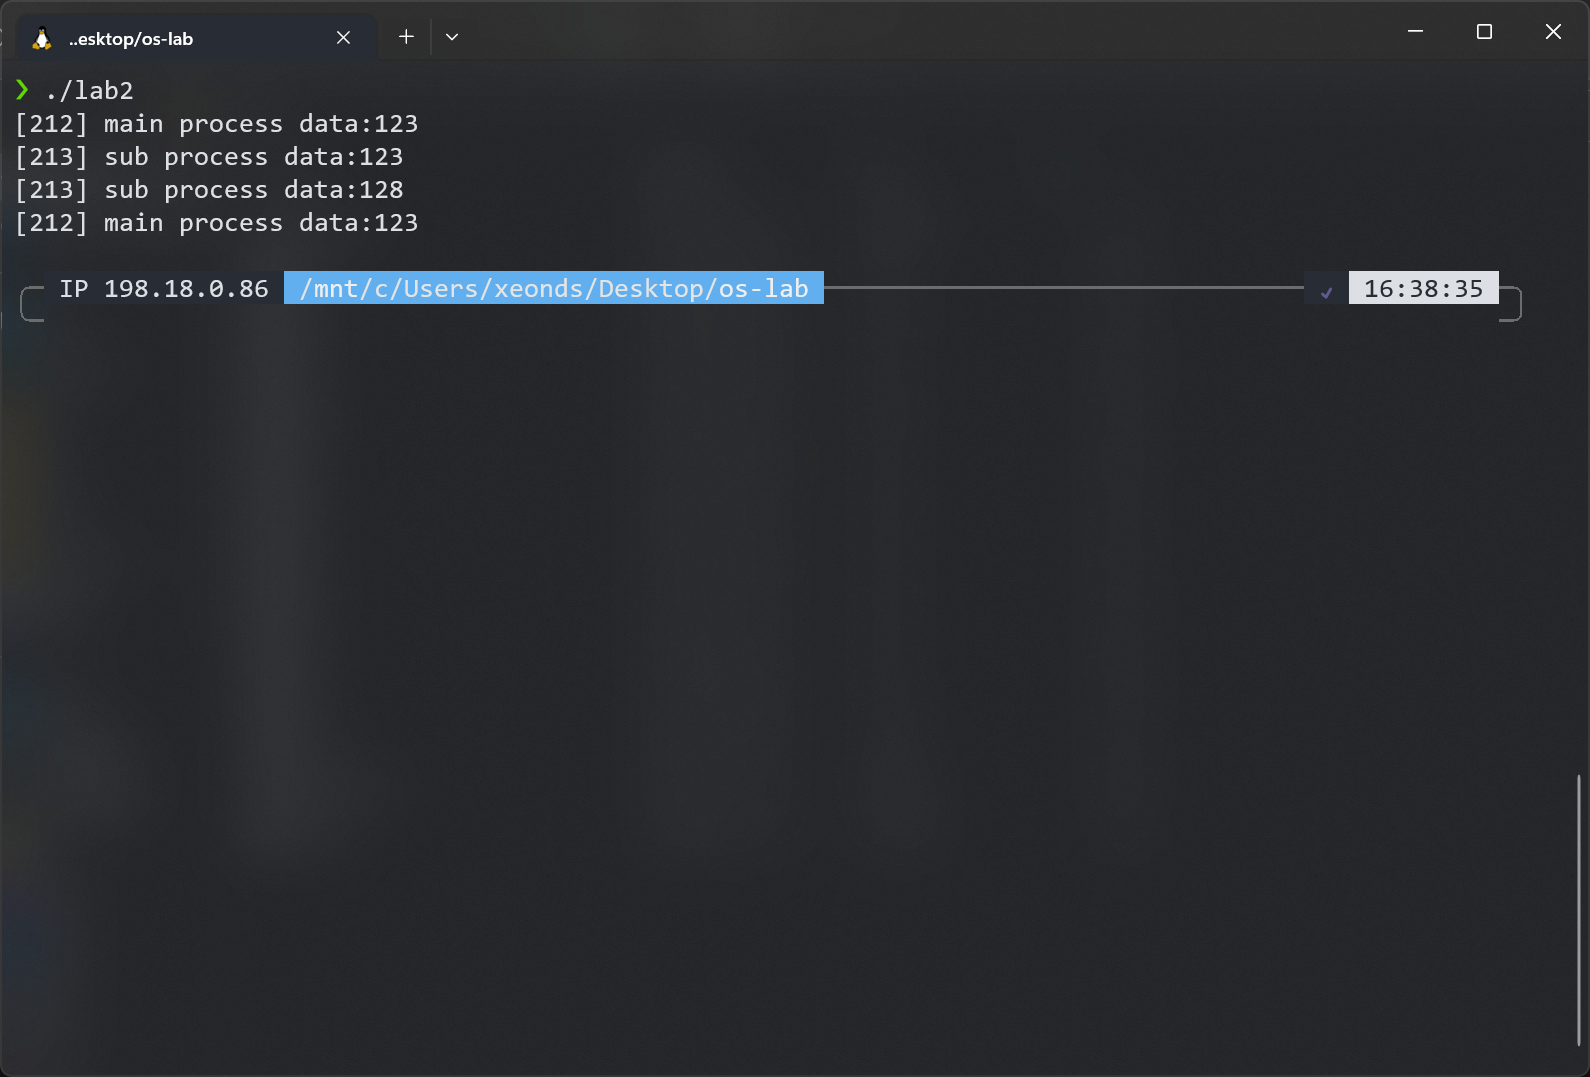
可以看到,两个线程都能访问和修改全局变量count,但是由于没有同步机制,导致输出结果不确定,有时候会出现两个线程同时输出相同的值。
通过这次实验,我懂得了Linux下创建多线程的方法,知道了如何使用全局变量作为进程数据,在线程之间进行数据共享。同时,我也意识到了线程之间存在数据竞争的问题,需要使用同步机制来保证数据的一致性和正确性。
创建一个main.c,并引入头文件signal.h和unistd.h。在主程序中调用fork()创建子进程,并根据函数返回值确定进程类型,并执行相应操作。
如果rc==0,则当前进程是子进程。子进程使用sleep()函数延迟一段时间后,使用kill()函数向父进程发送一个信号(如SIGUSR1)。
如果rc>0,则当前进程是父进程。父进程定义一个信号处理函数sighandler(),并使用signal()函数将该函数绑定到子进程发送的信号上。在信号处理函数中,打印出收到信号的信息,并使用exit()函数终止父进程。
#include <stdio.h>
#include <unistd.h>
#include <signal.h>
#include <sys/wait.h>
#include <sys/types.h>

int pid;

void sigchld_handler(int sig){
 if(sig==SIGCHLD){
  wait(&pid);
  if(WIFEXITED(pid)){
   printf("SIGCHLD->%d\n", WEXITSTATUS(pid));
  }
 }
 if(sig==SIGINT){
  printf("SIGINT\n");
 }
 return;
}

int main(void){
 signal(SIGINT , sigchld_handler);
 signal(SIGCHLD, sigchld_handler);
 pid=fork();

 if(pid<0){
  fprintf(stderr, "Fork failed.");
  return 0;
 } else if(pid==0) {
  // child process
  printf("[child_pid %d]started child process.\n", getpid());
  sleep(1);
  printf("[child_pid %d]running child process.\n", getpid());
  return 0;
 } else {
  while(!WIFEXITED(pid));
  return 0;
 }
}
可以看到,父进程成功接收到了子进程发送的信号,并执行了相应的处理函数。
通过这次实验,我懂得了Linux下信号通信的原理和用法,知道了如何使用系统调用来发送和接收信号,在父子进程之间进行简单交互。同时,我也了解了信号处理函数的编写方法和注意事项。
创建两个单文档应用程序Parent和Child作为父子进程。在Parent中引入头文件unistd.h和stdio.h。在主程序中使用pipe()函数创建一个匿名管道,并使用fork()函数创建一个子进程。
如果rc==0,则当前进程是子进程。子进程关闭管道的写端,并使用dup2()函数将管道的读端重定向到标准输入。然后使用execlp()函数执行Child程序。
如果rc>0,则当前进程是父进程。父进程关闭管道的读端,并使用dup2()函数将管道的写端重定向到标准输出。然后使用printf()函数向管道写入数据,并使用wait()函数等待子进程结束。
在Child程序中,引入头文件unistd.h和stdio.h。在主程序中使用scanf()函数从标准输入读取数据,并打印出来。
此处我使用fork()创建了两个进程来模拟父子进程通信,从原理上和两个单独进程的效果一样。
#include <stdio.h>
#include <stdlib.h>
#include <unistd.h>
#include <string.h>
#include <sys/wait.h>

int main(void){
 int fd[2], pid;
 char buffer[1024];

 if(pipe(fd)==-1){
  perror("pipe");
  exit(1);
 }

 pid=fork();
 if(pid<0){
  perror("fork");
  exit(1);
 } else if(pid==0){
  printf("Child: Writing to pipe\n");
  close(fd[0]);
  write(fd[1], "Hello, World!" ,strlen("Hello, World!"));
  exit(0);
 }else{
  close(fd[1]);
  wait(NULL);
  read(fd[0], buffer, sizeof(buffer));
  printf("Parent: %s\n", buffer);
 }

 return 0;
}
可以看到,父进程成功向匿名管道写入数据,并被子进程读取并打印出来。
通过这次实验,我懂得了Linux下匿名管道的原理和用法,知道了如何使用系统调用来创建和操作匿名管道,在父子进程之间进行双向通信。同时,我也了解了如何使用重定向技术来改变标准输入输出的来源和目的地。
创建一个main.c,并引入头文件unistd.h和stdio.h。在主程序中使用mkfifo()函数创建一个命名匿名管道,并使用fork()函数创建一个子进程。
如果rc==0,则当前进程是子进程。子进程使用open()函数打开命名匿名管道,并使用write()函数向管道写入数据。然后使用close()函数关闭管道,并使用exit()函数退出子进程。
如果rc>0,则当前进程是父进程。父进程使用open()函数打开命名匿名管道,并使用read()函数从管道读取数据。然后使用close()函数关闭管道,并使用wait()函数等待子进程结束。
#include <stdio.h>
#include <stdlib.h>
#include <unistd.h>
#include <string.h>
#include <fcntl.h>
#include <sys/wait.h>
#include <sys/stat.h>
#include <sys/types.h>

#define FIFO_NAME "/tmp/my_fifo"

int main()
{
 int pid=fork();
 if(pid<0){
  printf("Fork failed\n");
  exit(EXIT_FAILURE);
 } else if(pid==0) {
  int res;
  int open_mode = O_WRONLY;
  int i;
  printf("Child process %d opening FIFO O_WRONLY\n", getpid());
  res = open(FIFO_NAME, open_mode);
  printf("Child process %d result %d\n", getpid(), res);
  if (res != -1) {
   for (i = 0; i < 5; i++) {
    write(res, "Hello", 5);
    sleep(1);
   }
   close(res);
  }
  else {
   exit(EXIT_FAILURE);
  }
  printf("Process %d finished\n", getpid());
  exit(EXIT_SUCCESS);
 } else {
  int res;
  int open_mode = O_RDONLY;
  int i;
  char buffer[20];

  // wait for child to finish
  waitpid(pid, NULL, 0);
  printf("Parent process started.\n");
  printf("Process %d opening FIFO O_RDONLY\n", getpid());
  res = open(FIFO_NAME, open_mode);
  printf("Process %d result %d\n", getpid(), res);
  if (res != -1) {
   for (i = 0; i < 5; i++) {
    read(res, buffer, 20);
    printf("Process %d read %s\n", getpid(), buffer);
    sleep(1);
   }
   close(res);
  }
  else {
   exit(EXIT_FAILURE);
  }
  printf("Process %d finished\n", getpid());
  exit(EXIT_SUCCESS);
 }
}
可以看到,子进程成功向命名匿名管道写入数据,并被父进程读取并打印出来。
通过这次实验,我懂得了Linux下命名匿名管道的原理和用法,知道了如何使用系统调用来创建和操作命名匿名管道,在父子进程之间进行单向通信。同时,我也了解了如何使用文件操作函数来读写命名匿名管道
创建一个main.c,并引入头文件semaphore.h和unistd.h。在主程序中定义一个全局变量buffer作为缓冲区,并初始化为0。随后在主程序中创建两个信号量empty和full,分别表示空缓冲区的数量和满缓冲区的数量,并初始化为8和0。然后使用fork()函数创建一个子进程。
如果rc==0,则当前进程是子进程。子进程作为消费者进程,循环执行以下操作:使用sem_wait()函数等待full信号量,表示有产品可消费;使用sleep()函数模拟消费时间;将缓冲区的值减一,并打印出当前缓冲区的值;使用sem_post()函数增加empty信号量,表示释放一个空缓冲区。
如果rc>0,则当前进程是父进程。父进程作为生产者进程,循环执行以下操作:使用sem_wait()函数等待empty信号量,表示有空缓冲区可用;使用sleep()函数模拟生产时间;将缓冲区的值加一,并打印出当前缓冲区的值;使用sem_post()函数增加full信号量,表示增加一个满缓冲区。
#include <stdio.h>
#include <stdlib.h>
#include <signal.h>
#include <unistd.h>
#include <pthread.h>
#include <semaphore.h>

#define SIZE 8
static char buffer[SIZE], index=0;
sem_t items, space;
pthread_mutex_t mutex;

void *produce(void *arg){
 char c;
 while(1){
  sem_wait(&space);
  pthread_mutex_lock(&mutex);
  //c = getchar();
  c = 'a' + rand()%2;
  printf("[producer] %c\n", c);
  buffer[index++] = c;
  pthread_mutex_unlock(&mutex);
  sem_post(&items);
 }
}
void *consume(void *arg){
 char c;
 while(1){
  sem_wait(&items);
  pthread_mutex_lock(&mutex);
  c = buffer[--index];
  printf("[consumer] %c\n", c);
  pthread_mutex_unlock(&mutex);
  sem_post(&space);
 }
}
void print_buffer(void){
 int i;
 for(i=0; i<index; i++){
  printf("%c", buffer[i]);
 }
 printf("\n");
}

int main(void){
 pthread_t p1, c1, p2, c2, p3, c3;
 if(pthread_mutex_init(&mutex, NULL) != 0){
  printf("Mutex init failed\n");
  return 1;
 }
 sem_init(&items, 0, 0);
 sem_init(&space, 0, SIZE);

 pthread_create(&p1, NULL, produce, NULL);
 pthread_create(&p2, NULL, produce, NULL);
 pthread_create(&p3, NULL, produce, NULL);
 pthread_create(&c1, NULL, consume, NULL);
 pthread_create(&c2, NULL, consume, NULL);
 pthread_create(&c3, NULL, consume, NULL);

 pthread_join(p1, NULL);
 pthread_join(p2, NULL);
 pthread_join(p3, NULL);
 pthread_join(c1, NULL);
 pthread_join(c2, NULL);
 pthread_join(c3, NULL);

 return 0;
}
可以看到,生产者进程和消费者进程能够通过信号量来同步他们的操作,保证缓冲区的值不会超过8或低于0。
通过这次实验,我懂得了Linux下信号量的原理和用法,知道了如何使用系统调用来创建和操作信号量,在生产者消费者问题中实现进程同步。同时,我也了解了如何使用信号量来控制资源的访问和分配。